
One of the best features of a GatherBoard calendar is the ability to earn a profit from advertising, and an easy way to do this is through Google Ad Manager. This platform allows you to obtain sponsors and generate codes for their advertisements, which are used in the GatherBoard Management Portal. Allow us to walk you through the process of setting up your first ad! Desplázate hacia abajo para leer esta entrada en español.
1. Create a Google AdSense Account
Yes, this is a different service than Ad Manager, and yes, it’s confusing. But Google requires you to be registered here first before opening an Ad Manager account. Click here to sign up, and here is an article on the difference between AdSense and Ad Manager.
2. Create a Google Ad Manager Account
Now you can go to this page, and scroll down to click on the “Get Started” button. As long as you have less than 1 million monthly pageviews and an AdSense account, you can use the platform for free.
3. Complete the Skillshop Tutorial
Google has created a collection of simple, free tutorials to get you started with Ad Manager. Scroll down and click on the “Ad Manager” module. We’d recommend that you complete at least the first three tutorials: “Meet Google Ad Manager”, “Manage Settings With the Admin Tab”, and “Build Inventory and Ad Units”.
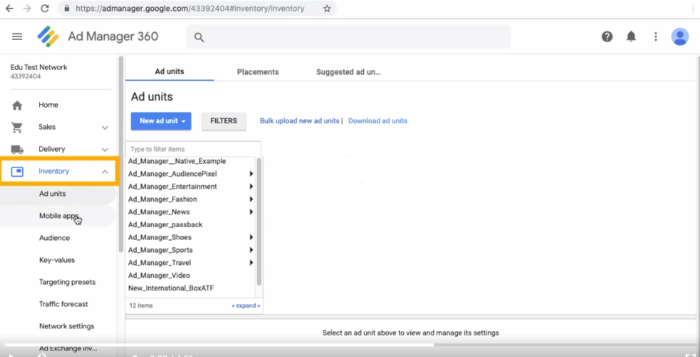
4. Generate an Ad Tag
Following the instructions in the tutorials, set up your account and create an ad. Then select an ad unit and click “Generate Tags”. This will generate some snippets of code for you. Don’t worry, you don’t have to be able to read it, it’s just to copy and paste.
5. Open an Ad Container in the GatherBoard Management Portal
Log into your account through the GatherBoard portal, and navigate to the “Ads” tab. Click on an ad region and one of the containers, and then select “Ad Code” from the drop-down menu.
6. Copy and Paste
Copy over the Google code for the document body into the GatherBoard ad container slot. Don’t forget to save!
7. Test Your Ad
Be sure to test your new advertisements on your calendar page to see that they display correctly and that all the links are functioning.
8. Celebrate!
If all has gone well, sit back and enjoy your new source of income! You can learn more about calendar monetization strategies in this video. If you are having technical issues, be sure to reach out to one of our representatives who will help you set it straight. Happy advertising!
~~~~~~~~~~~~~~~~~~~~~~~~~~~~~~~~~~~~~~~~~~~~~~~~~~~~~~~~~~~~~~~~~~~~~~~
Una guía rápida de Google Ad Manager
Una de las mejores características de un calendario de GatherBoard es la capacidad de obtener beneficios de la publicidad, y una manera fácil de hacerlo es a través de Google Ad Manager. Esta plataforma te permite obtener patrocinadores y generar códigos para sus anuncios, que se utilizan en el Portal de Administración de GatherBoard. ¡Te guiaremos a través del proceso de configuración de tu primer anuncio!
1. Crea una cuenta de Google AdSense
Sí, este es un servicio diferente de Ad Manager, y sí, es confuso. Pero Google requiere que te registres aquí primero antes de abrir una cuenta de Ad Manager. Haz clic aquí para inscribirte, y aquí hay un artículo sobre la diferencia entre AdSense y Ad Manager.
2. Crea una cuenta de Google Ad Manager
Ahora puedes ir a esta página, y desplázate hacia abajo para hacer clic en el botón “Get Started”. Siempre que tengas menos de un millón de vistas mensuales de la página y una cuenta de AdSense, puede utilizar la plataforma de forma gratuita.
3. Completa los tutoriales de Skillshop
Google ha creado una colección de tutoriales sencillos y gratuitos para empezar a usar Ad Manager. Desafortunadamente sólo están disponibles en inglés, pero puedes usar Google Translate para obtener ayuda. Desplázate hacia abajo y haz clic en el módulo de “Ad Manager”. Te recomendamos que completes al menos de los tres primeros tutoriales: “Meet Google Ad Manager”, “Manage Settings With the Admin Tab”, y “Build Inventory and Ad Units”.
4. Genera un Ad Tag
Sigue las instrucciones de los tutoriales, configura tu cuenta y crea un anuncio. A continuación, selecciona un bloque de anuncios y haz clic en “Generate Tags”. Esto generará algunos fragmentos de código para ti. No te preocupes, no tienes que ser capaz de leerlo, es sólo para copiar y pegar.
5. Abre un contenedor de anuncios en el Portal de Administración de GatherBoard
Inicia sesión en tu cuenta a través del portal de GatherBoard y ve a la pestaña “Ads”. Haz clic en una región de anuncio y en uno de los contenedores y, a continuación, selecciona “Ad Code” en el menú desplegable.
6. Copia y pega
Copia el código de Google para el “Document Body” y pega en el contenedor de anuncios de GatherBoard. ¡No te olvides de guardar!
7. Prueba tu anuncio
Asegúrate de probar tus nuevos anuncios en tu página de calendario para ver que se muestran correctamente y que todos los enlaces están funcionando.
8. ¡Celebra!
Si todo ha ido bien, ¡siéntate y disfruta de tu nueva fuente de ingresos! Puedes obtener más información sobre las estrategias de monetización de calendarios en este video. Si tienes problemas técnicos, asegúrate de ponerte en contacto con una de nuestras representantes que te ayudará a aclararlo. ¡Feliz publicidad!